This corn, avocado and tomato salad (or dip) is always a hit at summer parties. Quick and easy to make, it’s delicious served with chips for dipping or just as a side.


This corn, avocado and tomato salad (or dip) is always a hit at summer parties. Quick and easy to make, it’s delicious served with chips for dipping or just as a side.
This sweet and smokey chipotle honey vinaigrette dressing is sure to kick up your salad game!
Like this post? Let’s be friends! Follow me on Instagram & Facebook for more fun recipes and ideas! Click below-
I have spent the summer enjoying family time, exploring Utah with my husband and kids, and trying lots of new recipes! I’ve been perfecting these garlic breadsticks for a few years now and I think these are pretty darn near perfect. Homemade bread used to scare me (and sometimes it still does) but I think using instant yeast makes things pretty easy-peasy. It’s also easiest if you have some sort of mixer with a dough hook, but this could be made by hand as well. I have been trying to cut down on the amount of butter and I think this is the least amount possible. They are still indulgent, but they do use a lot less than when I first started making them. They go perfectly with so many meals. One of our family’s favorite is spaghetti and we love to have these and a side salad.


 Garlic Filling
6 tablespoons melted butter
2/3 cup grated Parmesan cheese (the green bottled stuff works great)
1 tsp garlic salt
1/2 tsp garlic powder
1/2 tsp dried parsley
Mix all ingredients together in a small bowl and set aside.
Breadsticks
1 1/2 cups warm water (105 – 110 degrees F°)
1 Tablespoon instant yeast
1 1/2 Tablespoons granulated sugar
1 Tablespoon olive oil
1/2 teaspoon salt
3 1/2 cups all-purpose flour
Add warm water, instant yeast, sugar, salt and olive oil to a large bowl or stand mixer. Stir to combine, using the dough hook if using a stand mixer.
Add 2 cups flour and allow to mix after each addition. Slowly add in the rest of the flour until dough pulls away from the sides of the bowl and is still slightly sticky. You only want to add the flour a little at a time because too much flour will make the breadsticks not soft and fluffy! Do not add more than 3 1/2 cups, but you may not need all the 3 1/2 cups depending on how your flour was measured.*
Cover the dough and let it rise about 30 minutes or until doubled in size. Remove the dough from the bowl and place on a lightly-floured surface. Roll dough into a large rectangle and spread garlic filling (recipe above) over all the dough. Using a pizza cutter, cut into about 12 equal strips.
Starting from the bottom of each strip, carefully twist the dough so that the filling is inside the twist. Put on the baking pan lined with parchment paper. Repeat with all the breadsticks.
Cover the baking pan with a cloth and allow the breadsticks to rest about 30 more minutes.
Preheat oven to 425° F and bake 11 to 12 minutes or until golden.
Breadstick recipe adapted from- Life in the Lofthouse
*I was taught to shake my flour a little bit before measuring so it’s not as compact. This helps not to put too much flour in your recipes.

I love a good pico de gallo. I think its delicious eaten alone with tortilla chips but it also adds the perfect flavor and acidity to tacos and other Mexican food. Although most recipes are similar, I have a few tips to make this the perfect pico de gallo. The tricks are in the method of preparing the ingredients.
First, you want to make sure you pick the best ingredients. You will want Spanish or yellow onions that are nice and firm, no soft spots. Pick large limes, with a little bit of give when you squeeze them instead of ones that are rock hard. Choose bright, fresh cilantro with no brown spots. Your tomatoes should be firm and vibrant red.
Okay, so now you’ve rounded up the perfect ingredients and are ready to make the pico!
First secret: After you have removed the outside skin of the onion, slice off the top and bottom and cut the onion in half. Run both halves of the onions under cold water to rinse. This helps to take the “bite” out of the onion. You can also soak your onion in cold water to remove more of the bite, but I find rinsing works great for me. Dice your onion small and put into a glass bowl.

Second secret (and I think the most important): Sprinkle the entire teaspoon of salt over the onions. Using the back of a large fork or spoon you are going to smash the onion down with the salt. Do this for a couple of minutes and your onion should start to look wet and glossy. Now add your lime juice, chopped cilantro and tomatoes. Allow flavors to mix for about 15 minutes before serving. Enjoy with tortilla chips or on your favorite taco or burrito! It is also excellent on this carne asada recipe.

Perfect Pico de Gallo
1 large yellow onion diced
2 large hot house tomatoes (or your favorite tomato), diced
1 bunch cilantro, chopped finely (no stems)
1 tsp salt
1/2 tsp pepper
2 large limes, juiced
Rinse onion and dice. In a large glass bowl, add onion and salt. Using the back of a fork, smash onion pieces down, until wet and glossy. Add lime juice, pepper, cilantro, and tomatoes and stir to coat. Allow to rest for 15 minutes before serving. Taste and add additional salt and pepper as needed.


So I’ll get straight to it- there is Spam in this recipe (Wait! don’t stop reading yet!) I know there are two camps of people. You either love Spam or you hate it. Well, maybe three camps. You think you hate it because you would never, EVER try canned meat. I grew up eating Spam and I am definitely in the “love it” camp. I was born on Guam, and according to some fun facts I found online, Guam is the largest consumer of Spam per person, per year. Now, I don’t think I eat that much Spam, but I do love it in this fried rice recipe. But, if you are not a Spam lover, you can easily substitute diced ham (or even cooked chicken) in its place and still have some delicious fried rice. An added bonus to Spam, is its easy storage convience in my pantry and the saltiness of it makes this rice so savory and good! I love to make this rice for dinner either as the main meal with an egg roll on the side, or we have it as a side with another dish like these lettuce wraps.
Fried rice at home is easier than you might think. There are two important tips I can tell you that will affect the taste of your rice. First, make sure to use the right type of rice- medium or short grain. Most of the white rice that is readily available in grocery stores is long grain. The short grain is a sticky rice and is what I prefer to use for fried rice. I usually buy a huge bag of Calrose short grain rice at Costco because we eat lots of rice, but I have found it is usually in the Asian food section at grocery stores. The second tip is to use a good quality soy sauce. There are a lot of different kinds of soy sauces, from light to dark, and Chinese to Japanese. Some soy sauces are chemically or artificially produced. These will not taste very good if you use them. I love to use Kikkoman soy sauce which is available in most grocery stores.
This is a simple recipe, and you can easily jazz it up by adding sesame oil instead of vegetable oil, some green onions, other vegetables like mushrooms, fresh ginger, or even some fresh garlic instead of powdered. I like it the simple way because it means I have usually have everything I need already in my pantry. This recipe is great for those weeknight meals when you aren’t sure what to cook. I use frozen mixed vegetables to make the meal quick (no chopping) and I also have a rice cooker which makes cooking the rice easy.

Spam Fried Rice
5 cups cooked Calrose rice (2 1/2 cups uncooked rice)
1 can Spam diced into 1/2 inch cubes or 2 cups diced ham
1 tablespoon vegetable oil*
1 tsp garlic powder
1/2 tsp ground black pepper
1/4 cup soy sauce
2 cups mixed frozen vegetables
5 eggs
In a large pot or pan, heat vegetable oil and add Spam, allowing it to brown for 5-7 minutes, stirring periodically. Add the garlic powder and black pepper and stir. Crack your eggs into a large bowl and whisk. Moving the Spam to one side, add the eggs and scramble them. (You can also cook the eggs in a separate frying pan if desired, I just try to save myself washing two pans). Add the frozen mixed vegetables and allow to cook for 4-5 minutes until warmed through. Add the cooked rice to the pot and mix to incorporate everything allow to cook for another 6-7 minutes. Slowing add the soy sauce and stir until incorporated. Add a few more tablespoons if rice seems like it needs more. Serve with egg rolls.

*You can also use sesame oil if desired.
If you are looking for the best hot artichoke dip recipe, look no further! This hot artichoke dip with its secret ingredient (green chilis) is one of my favorite appetizers!

This post contains affiliate links. This means if you make a purchase through my links, I’ll receive a small portion of your purchase at no extra cost to you.
If you are looking for a delicious side dish for Thanksgiving or Christmas, then don’t overlook this awesome blueberry pomegranate Jell-o salad! We have it on the menu every year. It is definitely a family favorite. This recipe comes from my mother-in-law. She usually serves it with nuts and celery for added crunch, but I prefer mine without. My husband loves the celery so sometimes I will split the salad into two serving dishes- one with nuts and celery and one without. This recipe is pretty simple to put together and it can be made a few days in advance which is nice because it’s one less thing to have to worry about the day of Thanksgiving or Christmas. It’s a sweeter salad, and sometimes I like to eat it more like a dessert with some whipped cream to top it off.


Blueberry Pomegranate Salad
2 cups water
2 packages (3 oz) raspberry Jell-0
1 package cream cheese softened (8 oz)
1 can crushed pineapple undrained (20 oz)
1 can blueberry pie filling (21 oz)
1 pomegranate (about 1 1/2 cup arils)
*3 1/2 cups heavy whipping cream (or 1 tub cool whip)
Optional- 1 cup celery diced
1/2 cup chopped walnuts or pecans
In a small pot, bring the two cups water to a boil. Put both packages of Jell-o in a large mixing bowl and add the boiling water and whisk till dissolved. Add the softened cream cheese and whisk until well combined (there may be tiny flecks of cream cheese left and that is okay). Add the pineapple, blueberry pie filling, (and celery and nuts if desired) and 1 cup of the pomegranate arils (reserving about 1/2 cup for topping) and stir until well combined. Refrigerate until the Jell-o is set (about 4-5 hours). Whip the whipping cream with a mixer until stiff peaks form. Fold into the Jell-o mixture. Transfer to a large serving bowl or a 9X13 pan, topping with remaining pomegranate seeds. Keep refrigerated until ready to serve.
*For a thicker salad use 1 1/2 cups whipping cream

This grape salad is delicious and a great side for a picnic or barbecue. Sweet, crunchy grapes topped with a sugary, creamy topping!

I love a good slow cooker meal, because its so nice to have dinner ready without much prep. Pulled pork sandwiches are one of my favorite summer meals because you don’t have to heat up your whole house and you can feed a crowd. One of my favorite parts about this pulled pork sandwich is the cilantro coleslaw. It’s different from others I have tried, because it’s not overly sweet. It is still creamy and crunchy, plus the cilantro adds a nice freshness to it. Even if you are not usually a coleslaw person you should give this one a try! I really think the coleslaw makes these sandwiches perfect. We usually serve our kids a deconstructed sandwich and they seem to eat it better than as a sandwich.


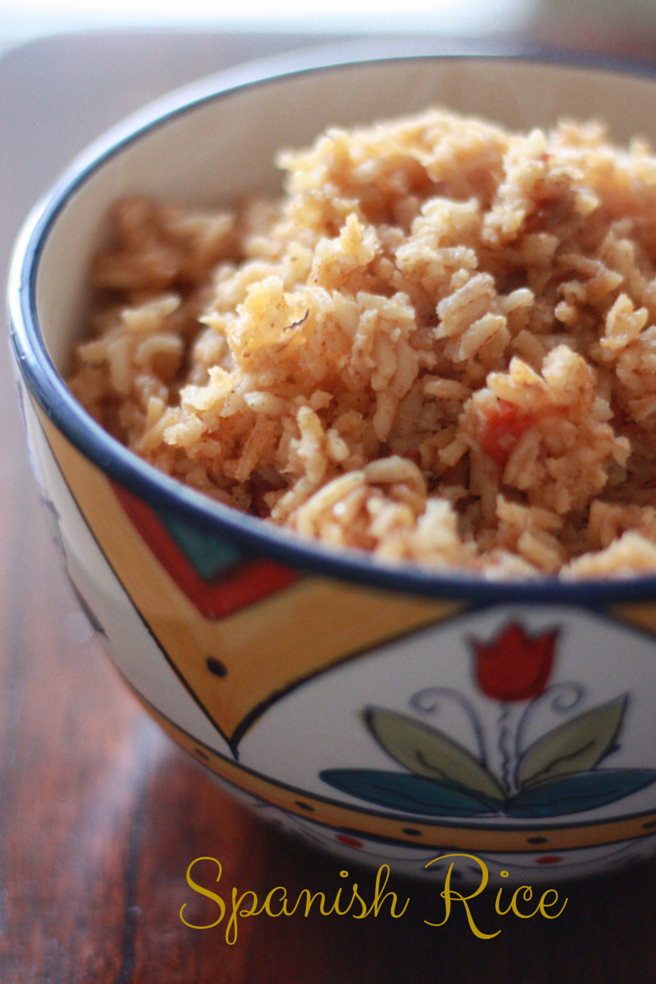
Mexican Rice
1 tablespoon oil
1 cup uncooked long grain white rice
1/2 cup tomato sauce
2 cups water (or 1 can chicken broth-omit the chicken base/bouillon)
1 tsp chicken base or chicken bouillon
1 tsp garlic salt
1 tsp cumin
1 tsp taco seasoning
Heat oil in a saucepan over medium heat. Add rice and stir often, until rice turns a nice golden toasty color. Add the seasonings and cook for 30 seconds until fragrant, add tomato sauce and water and bring to a boil. Cover, reduce heat to low (make sure a simmer is still maintained) and cook for 20-25 minutes until rice is tender. Mix and fluff with a fork.
Recipe Source: Adapted from Kick Off Those Heels N Cook
Growing up one of my favorite places to eat was a little Chinese restaurant down the street from our house. They had the most delicious Chinese food. When I moved stateside I was surprised how different the Chinese food I grew up with in Germany was to the local Chinese places. In Germany, all the Chinese food I ordered came with lots of fresh vegetables. Here, it seemed like everything was deep fried and covered in sweet sauces. When I started dating my husband, one of the places he took me to was P.F. Chang’s and I fell in love with the crispy, savory lettuce wraps. I scoured online to find the perfect recipe so I could recreate them at home. I love the combination of chicken and mushrooms in the cold lettuce. So good! Chicken Lettuce Wraps
1 tablespoon oil
1 chicken breast finely chopped
1/2 tsp garlic salt
1/2 tsp black pepper
1 tsp fresh grated fresh ginger
2 garlic cloves grated or minced
1 package baby portabello mushrooms diced
1 can sliced water chestnuts diced
3 green onions chopped
Stir Fry Sauce
3 tablespoons soy sauce (I prefer Kikkoman brand)
1 tablespoon sugar
1 tablespoon rice vinegar
Saute the chicken breast in the oil until no longer pink and cooked through in a large pan over medium heat. Season with garlic salt and pepper. Add the mushrooms and water chestnuts and cook for 5-7 minutes until mushrooms cook down. Add the stir fry sauce, ginger, garlic and green onions and cook for another 2-3 minutes. Serve in iceberg lettuce leaves.
Dipping Sauce-
1/2 cup sugar
1⁄2 cup water
2 tbs soy sauce
2 tbs rice wine vinegar
2 tbs ketchup
1 tbs lemon juice
Mix together dipping sauce ingredients and serve with lettuce wraps.
*Tip- I buy my ginger and then peel all the skin off and place in a ziplock bag and freeze it. It’s so much easier to grate this way and also you can always have ginger on hand for recipes. I grate my garlic just like my ginger.
Recipe slightly adapted from: Food.com
You must be logged in to post a comment.